News

Latest news and current events from around the world including special reports, entertainment news and exclusive video

Business

All the latest breaking business news from banking, stocks, currencies, funds and commodities to rice, garments and tourism

Download

Free downloads for Windows, Mac, iOS and Android computers and mobile devices. Every category of desktop software...

Life Style

Lifestyle is about the parts of our lives that are maybe a little more personal than everything else. It's how we make our homes, relate to our loved ones, raise our ...

Culture

The latest cultural news, criticism, including television, theatre, movies, music reviews, and Goings On About Town.

Health

Get energizing workout moves, healthy recipes, and advice on losing weight and feeling great...

Showing posts with label Photoshop. Show all posts

Thursday, February 27, 2014

Create Light Rays in Photoshop

create-light-rays-in-photoshop---featured

Learn How to Create Light Rays in Photoshop

In this Photoshop tutorial we’ll learn to create realistic light rays. This simple technique is great for bright images with light sources. No special Photoshop skills required to create your own cool rays and this tutorial will let you create rays in five minutes.

Tutorial Details and Resources

Difficulty: Beginner
Apps: Adobe Photoshop (CS or later)
Estimated Completion Time: 5-10′ Minutes
Resources: Green Lake

Step 1 > Rays

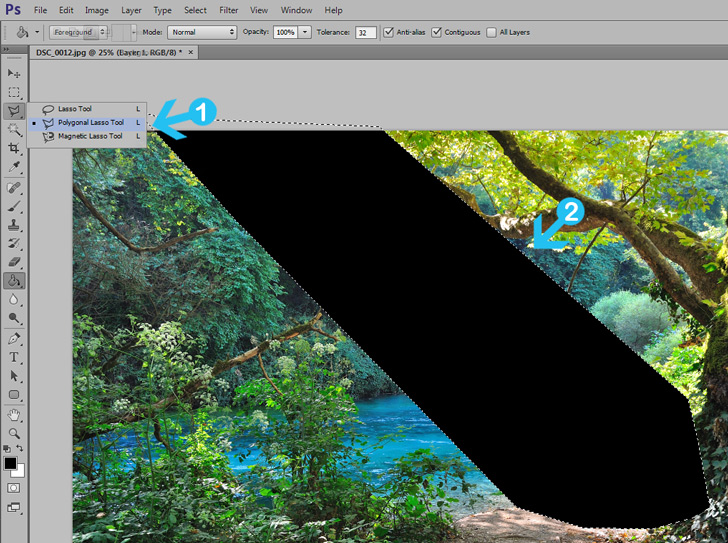
Let’s go straight to the point and create a new layer. Pick the Polygonal Lasso Tool (L) on your toolbox and create a quick selection in the area where you want to add rays of light. Next, fill the selection with black color and press (Ctrl + D) to deselect.

create light rays in photoshop - step 1

Step 2 > Difference Clouds & Threshold

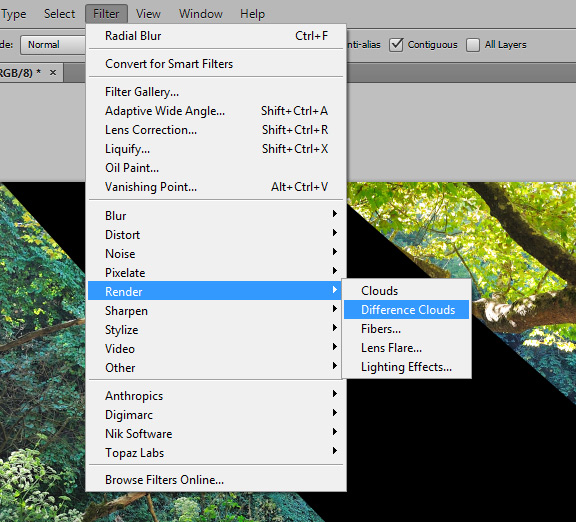
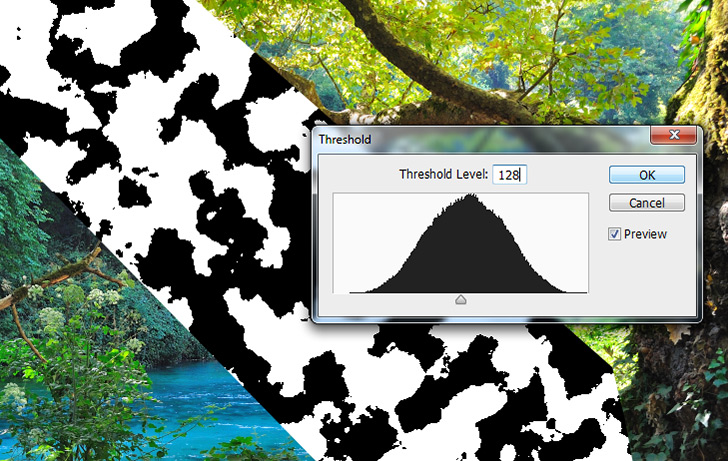
With the black shape layer active go to Filter > Render > Difference Clouds (image a). Next, go to Image > Adjustments > Threshold and press OK with the default values (image b).

a)
create-rays-of-light-in-photoshop-step2

b)
create-rays-of-light-in-photoshop-step2b

Step 3 > Radia Blur

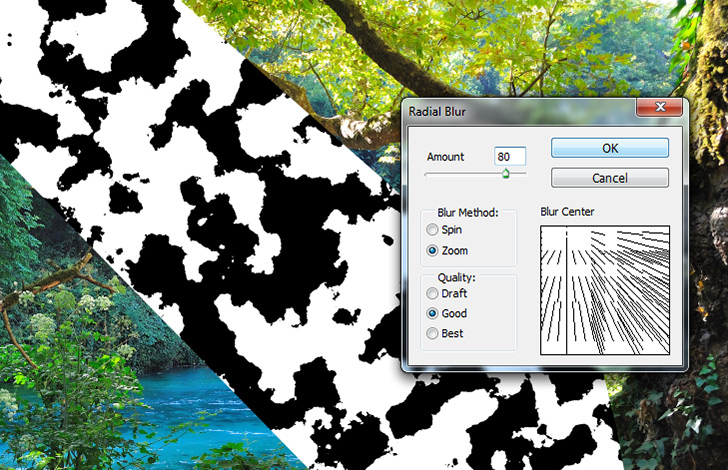
Go to Filter > Blur > Radial Blur and add change the settings like the image below:

Amount: 80, Blur Method: Zoom, Quality: Good. Make the Blur Center follow the light rays angle and press OK.
create-rays-of-light-in-photoshop-step 3

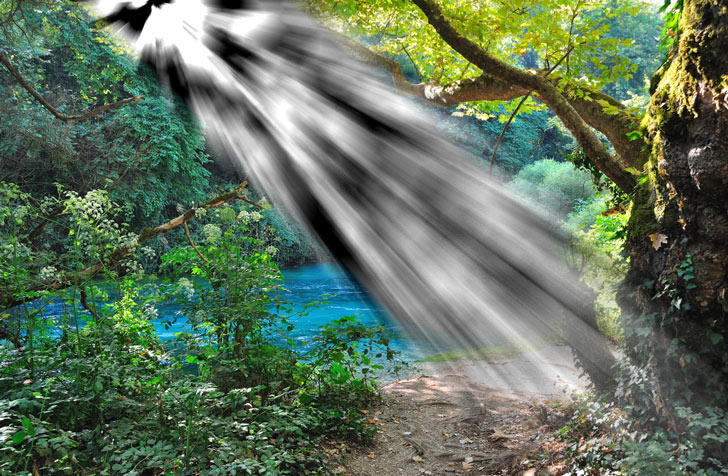
Result:
create-rays-of-light-in-photoshop-step 3b

Step 4 > Blending Mode & Opacity

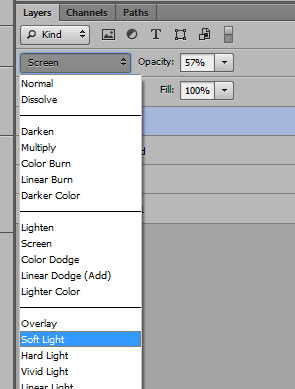
Change the Blending Mode to Soft Light and lower the opacity between 50% to 70% depends on your taste.

create-rays-of-light-in-photoshop-step 4

Conclusion

Remember to change the angle of radial blur similar to your image. If your source of light is not the sun but a continuous artificial light then skip step 2.

light-rays-in-ps---preview
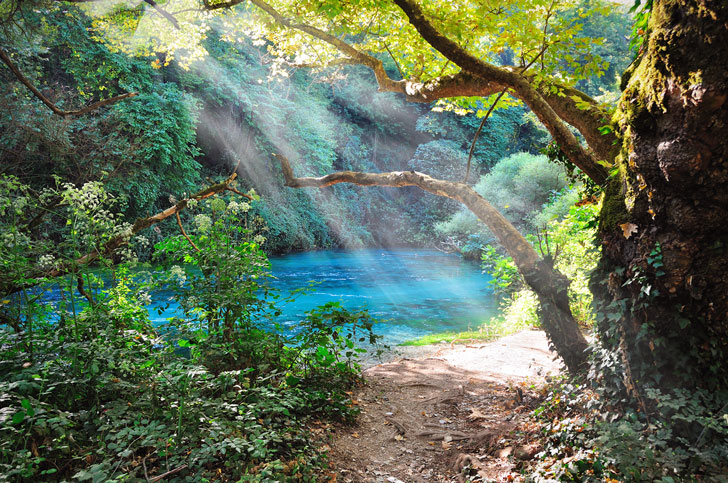
Final Image

Replace the Sky in Photoshop

replace-the-sky-in-photoshop---featured

Learn How to Replace the Sky in Photoshop

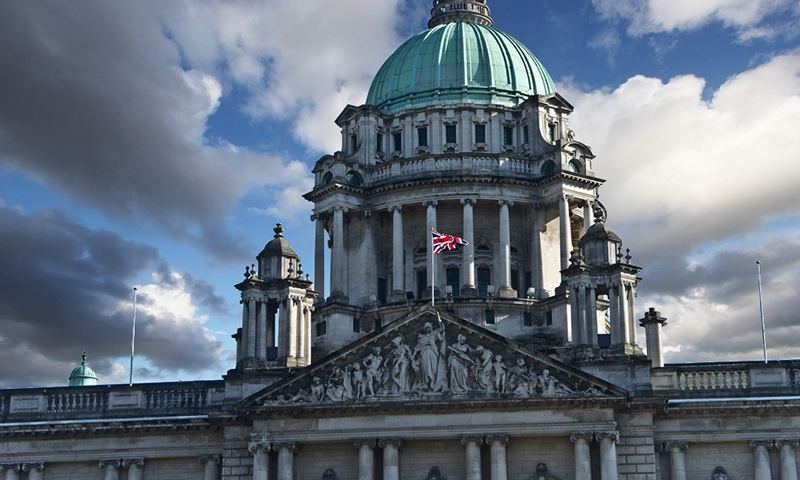
In this Photoshop tutorial we’ll learn how to replace the sky in Photoshop. When we capture photos, usually something is not looking good inside the picture. Very often the sky is underexposed or overexposed. Sometimes it may be dull or boring. With this easy technique you can replace any sky in minutes.

Tutorial Details and Resources

Difficulty: Beginner
Apps: Adobe Photoshop (CS or later)
Estimated Completion Time: 5-10′ Minutes
Resources: City Hall by William –  Sky by zaphad1

Step 1 > Quick Selection

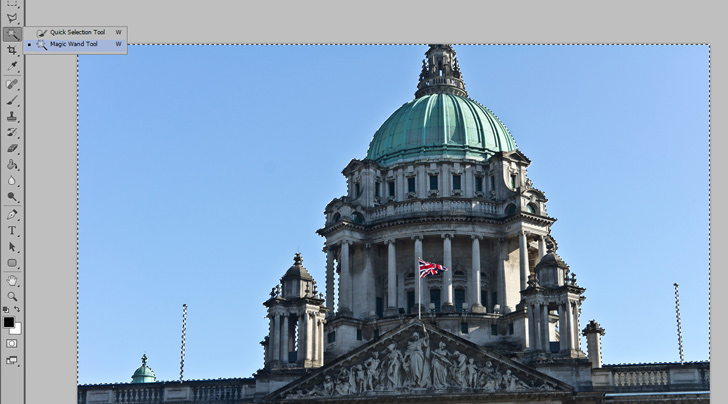
Pick the Magic Wand Tool (M) with 20 Tolerance and make a selection of the sky you want to replace. You can use your favorite selection method but Magic Wand Tool is quick and easy for images like this.

replave-sky-in-photoshop-step-1

Step 2 > Copy the Sky

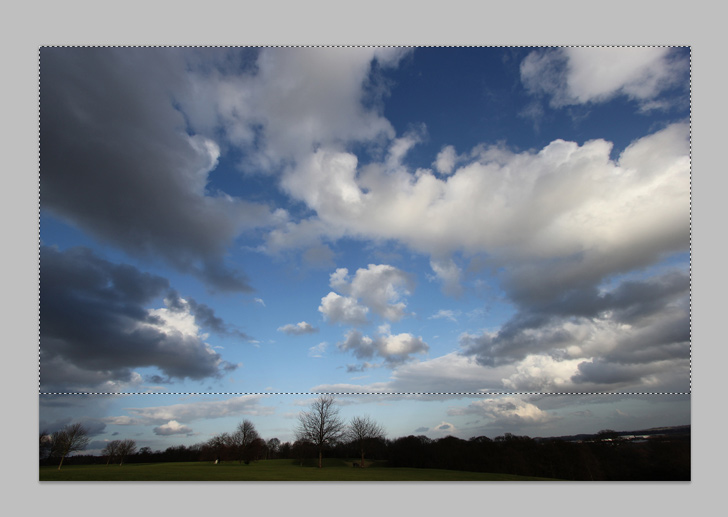
Open the new sky image in new Photoshop document and quickly select the sky. Go to Edit > Copy or press (Ctrl + C) on your keyboard to copy the sky.

replace the sky in photoshop - step 2

Step 3 > Replace the Sky

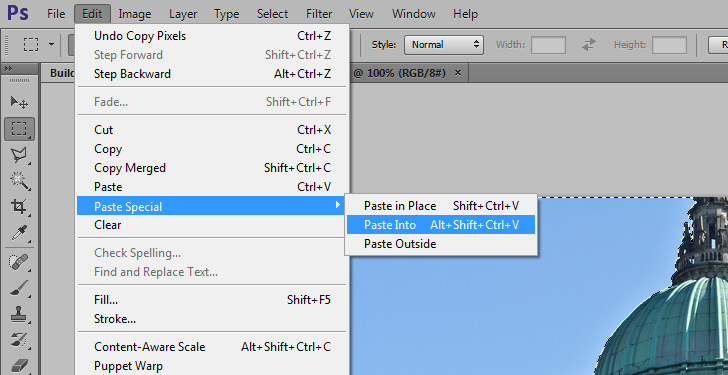
With the City Hall image active go to Edit > Paste Special > Paste Info to replace the sky. Scale the new sky if needed.

replave-sky-in-photoshop-step-2b

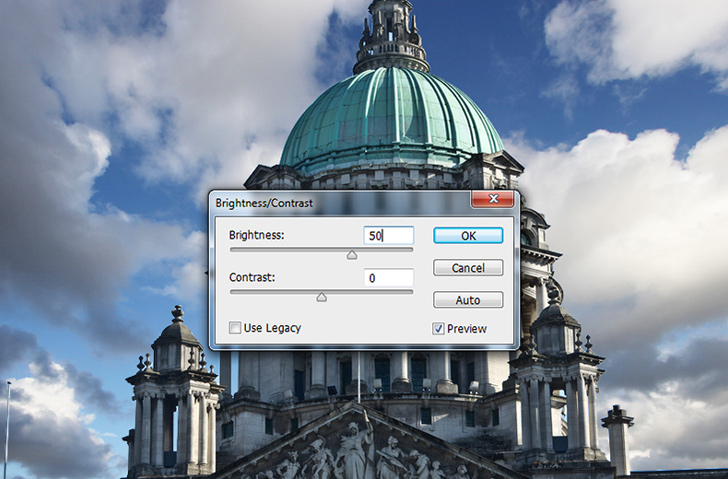
Step 3 > Brightness

If the new sky is darker from the original go to Image > Adjustments > Brightness/Contrast and increase the brightness until you like the result. Repeat the same technique if the sky have different color toning but this time change color balance or hue/saturation. For this image i increased only the brightness by 50.


replave-sky-in-photoshop-step-3


Conclusion

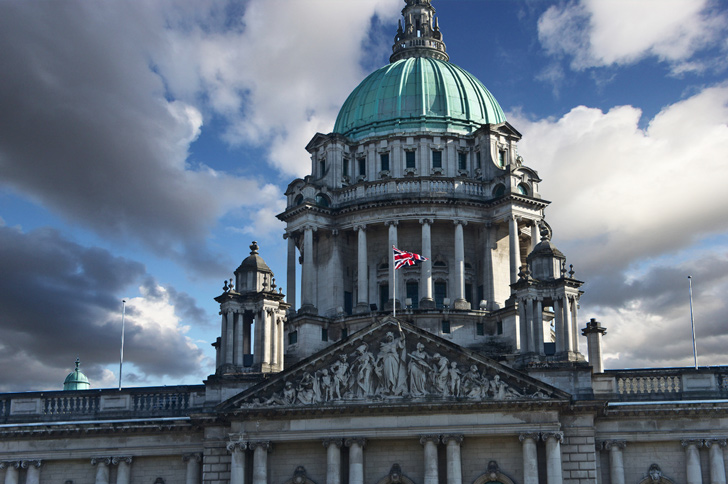
When you want to replace the sky try to find a similar image. Images shot in different weather conditions have different white balance. You have to change the brightness and color toning.

final-preview--replace-sky-in-ps
Final Image

Thursday, February 20, 2014

Add Rain Effect in Photoshop

rain effect in photoshop - photoshop tutorial

Create a simple rain effect in Photoshop

In this quick tutorial, we’ll learn how to create a simple rain effect in Photoshop. For good results make sure your image is good for this effect. Use dark photos with clouds and water. To make the effect more realistic we are going to add a layer mask and change the intensity of rain in some areas.

Tutorial Details and Resources

Difficulty: Beginner
Apps Used: Adobe Photoshop (CS5 or later)
Estimated Completion Time: 5-10′ Minutes
Resources: Girl with umbrella by Angelo

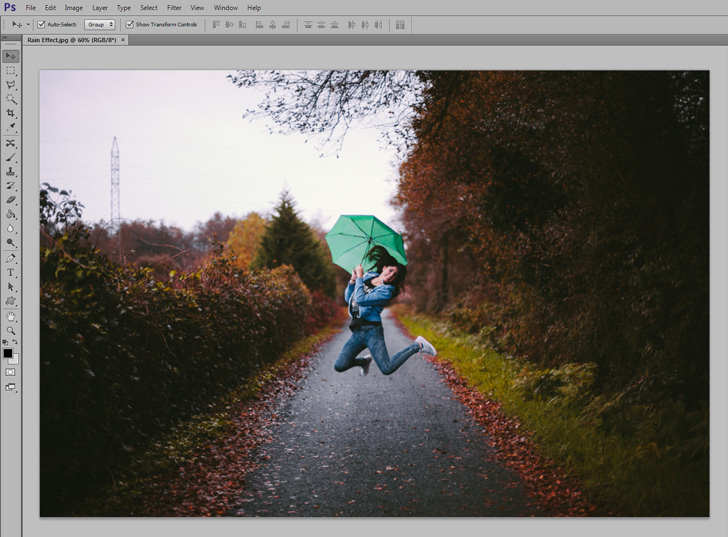
Step 1 > Open the Image

Othen the image you want to edit in Photoshop. I used my example at 1600x 1067px resolution.


add realistic rain effect in photoshop step 1

Step 2 > Highlight

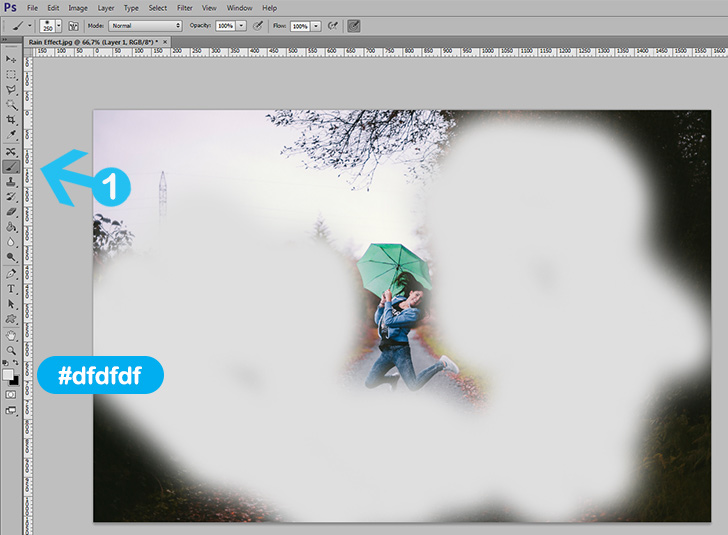
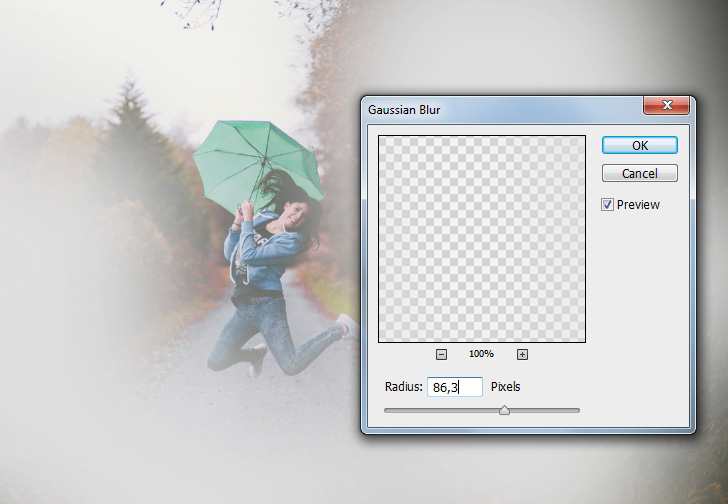
We are going to create a highlight before we add the rain drops. Create a new layer and pick the Brush Tool (B) in your toolbox. Set brush size to 250px, hardness to 0 and #dfdfdf as color. Paint around the girl like the (image a). Next, go to Filter > Blur > Gaussian Blur and add 86 pixels Radius. Press OK to confirm and return back. Set the blending mode to Overlay.

a) Pick a soft grey brush and paint around the girl.
rain drop effect in photoshop step 2


a) Add Gaussian Blur with 86 pixel Radius and set blending mode to Overlay.
rain drop effect in photoshop step 2b

Step 3 > Rain Drops

To create the rain drops firs create a new layer and rename it “Rain Drops”. Fill the new layer with black color (#000000) using the Paint Bucket Tool (G). Go to Filter > Noise > Add Noise and change the Amount to 70%, Distribution to Gaussian and check the Monochromatic box. Next, go to Image > Adjustment > Levels to add some contrast. Set Midpoints to 0,32 and Shadows to 22 like the image b.

a) Add noise with 70% Amount.
rain drop effect in photoshop step 3a

b) Add contrast with Levels.
add rain drop effect in photoshop step 3b

Step 4 > Motion Blur

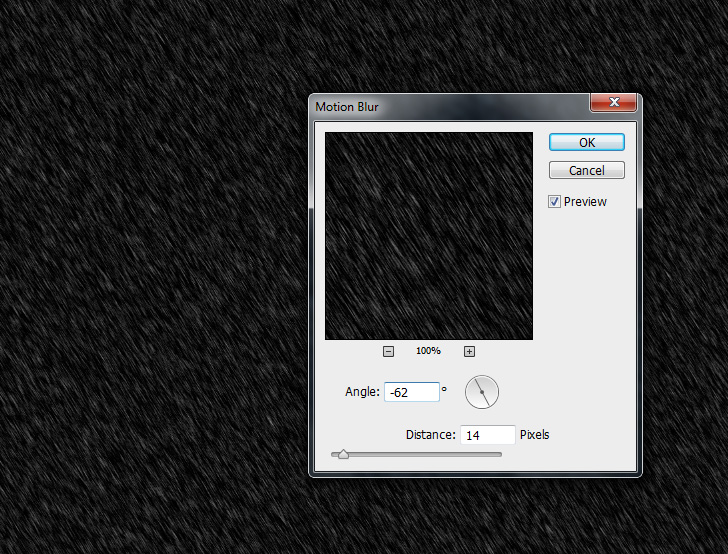
Go to Filter > Blur > Motion Blur and change the Distance to 14 pixels. Set the Angle to -62 and press OK. Change the blending mode to Screen and lower the opacity to 95%.

add rain effect in photoshop step 4a

Step 5 > Intensity

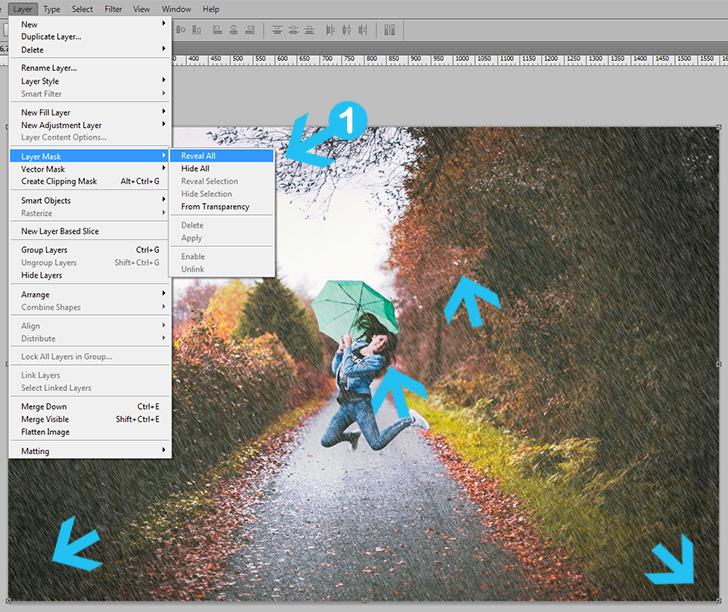
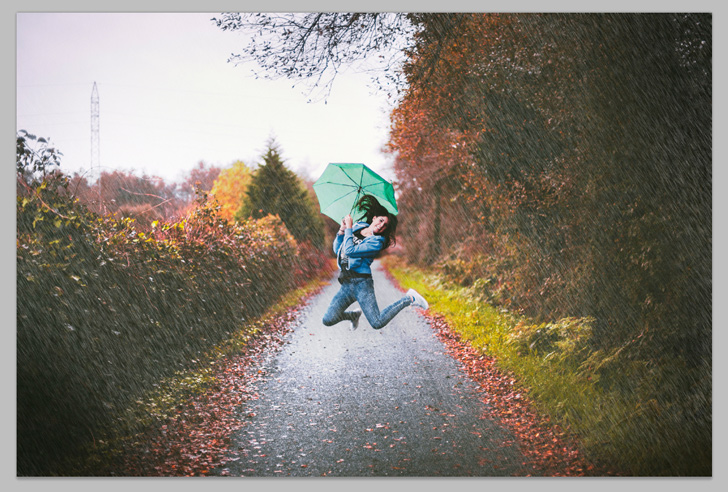
After the motion blur the rain intensity look the same around the image. To make the effect more realistic we need to lower the intensity in bright areas. First, go to Layer > Layer Mask > Reveal All to add a layer mast. Pick the Brush Tool (B) with 200-250px size, 30% opacity and black color. With the layer mask active paint over the bright areas to make them less intense.

a) Add layer mask and paint over the bright areas with black brush.
rain effect in photoshop step 5a

b) The intensity is not the same anymore.
rain effect in photoshop step 5b

Step 6 > Contrast

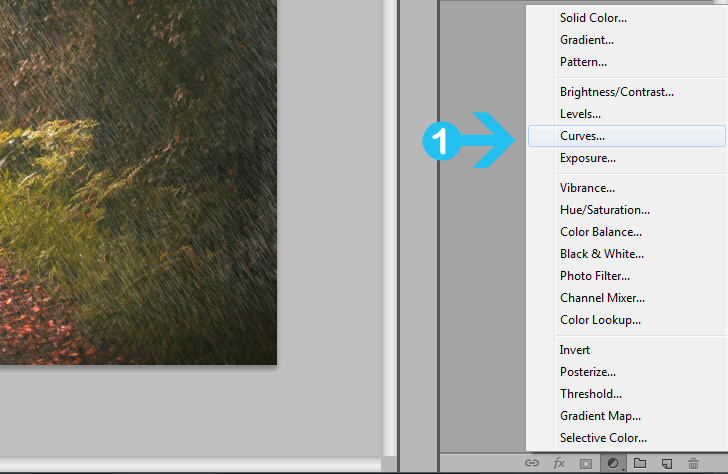
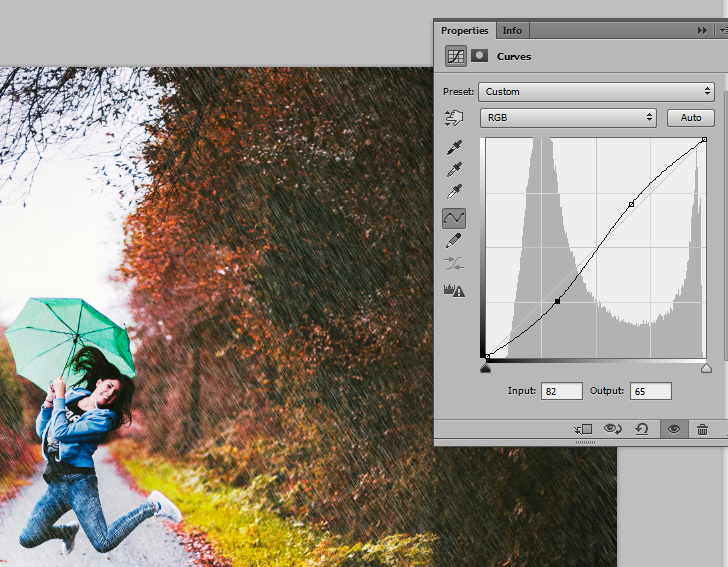
To add some contrast and make the image more appealing add a new Curves Adjustment layer (image a). With the RGB channel active change the line similar to (image b).

add rain effect in photoshop step 7a

rain effect in photoshop step 6b

Conclusion

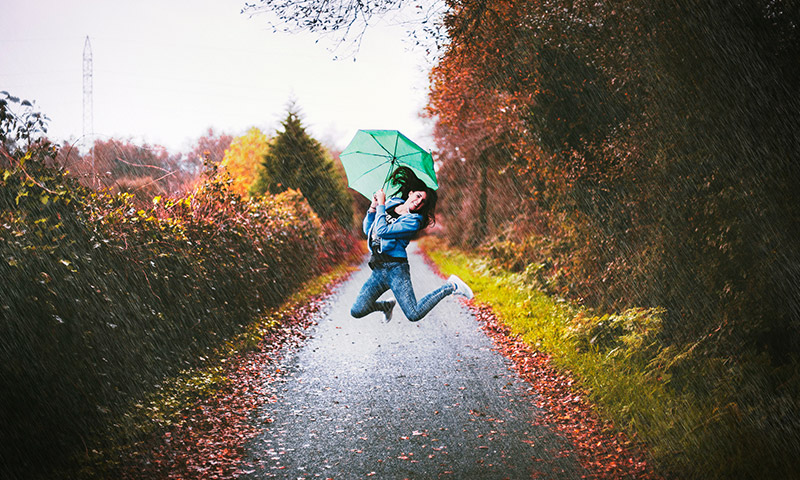
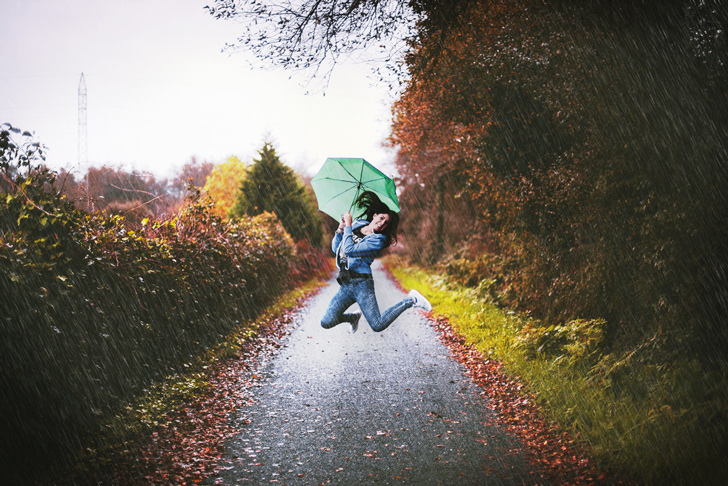
Disable the layers to see the difference after every step. Experiment with the angle of motion blur and rain intensity in bright areas. Every image is different so you have to use different settings.

rain effect in photoshop - preview
Final Image

Create Party Balloons in Photoshop


creating party balloons in photoshop 

Create colorful party balloons in Photoshop

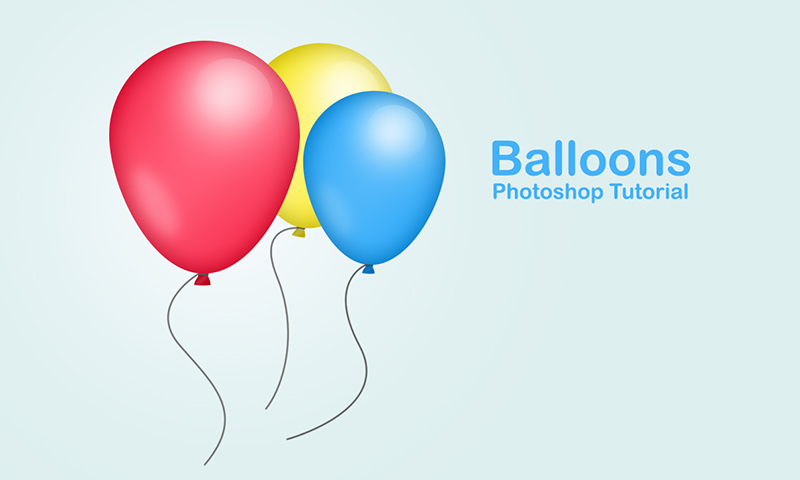
In this Photoshop tutorial i will show you how to create colorful party balloons. To create the balloons we need only 2 shapes and some highlights to make it look three-dimensional. You can also create different shapes, add stars and other shapes when we done.

Tutorial Details and Resources

Difficulty: Beginner
Apps Used: Adobe Photoshop (CS5+)
Estimated Completion Time: 20-30′ Minutes
Resources:

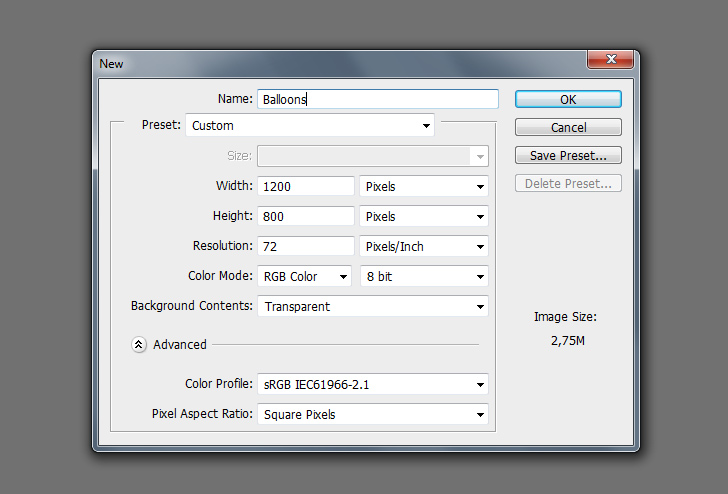
Step 1 > Create a New Document

For this tutorial create a new document with 1200px Width and 800px Height. Change your foreground color to #ddefef and fill the empty background using the Paint Bucket Tool (G).

create party balloons in photoshop step 1


Step 2 > Create the Balloon

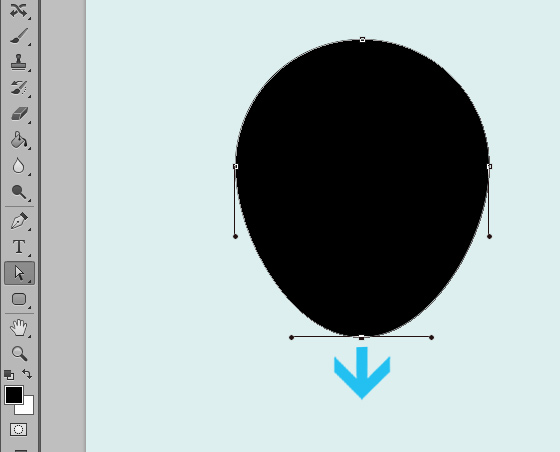
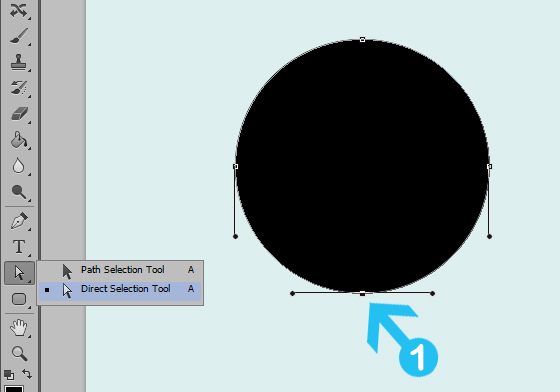
Press (D) on your keyboard to reset the colors on your palette. Pick the Ellipse Tool (U) in your toolbox and draw a perfect circle by pressing (Shift). With Direct Selection Tool (A) select the bottom path of your circle and push it downwards.

a) Create a perfect circle with Ellipse Tool.
create party balloons in photoshop step 2

b) With Direction Selection Tool push the bottom path downwards.
create party balloons in photoshop step 2b


create party balloons in photoshop step 2c

Step 3 > Blending Options

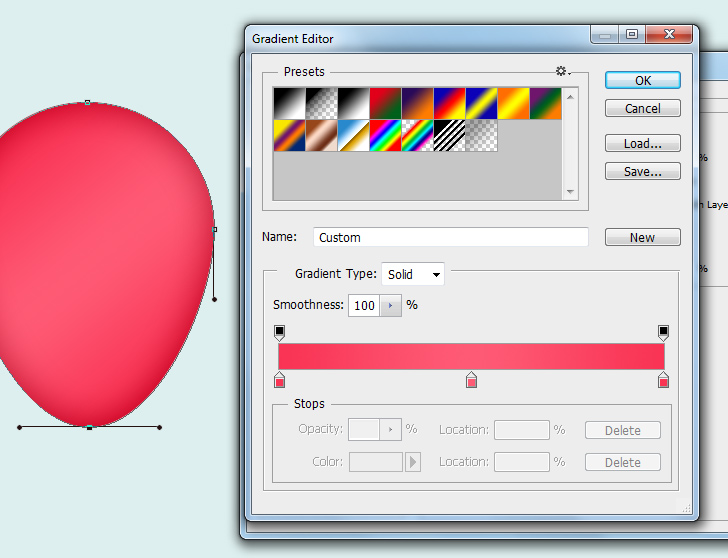
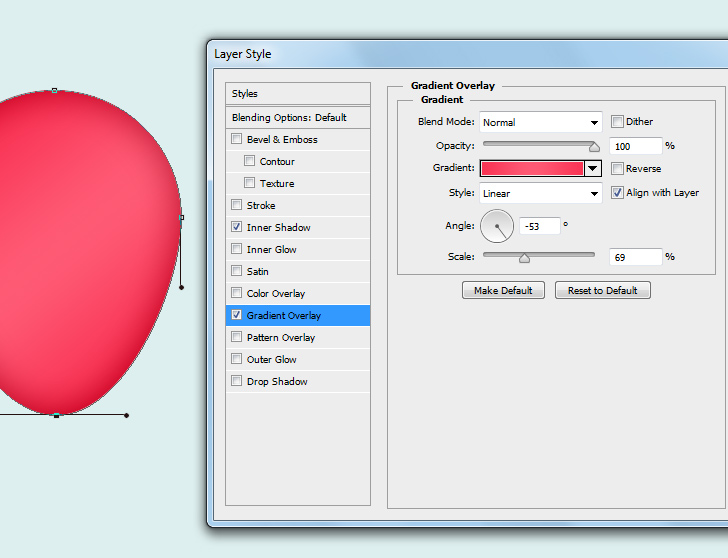
With the balloon layer active go to Layer > Layer Style > Blending Options and add the follow settings:

a) Gradient Overlay: 100% opacity, 69% scale and -53 angle.
create party balloons in photoshop step 3a

Gradient colors: #f93454 – #fe5a74 - #f93454
create party balloons in photoshop step 3b

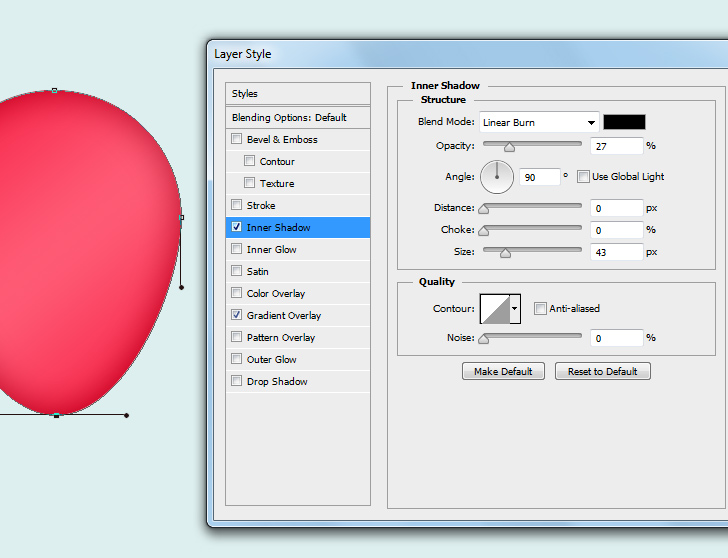
b) Inner Shadow: Black color with linear burn blend mode, 27% opacity, 90 angle and 43 size.
create party balloons in photoshop step 3c

Step 4 > Knot

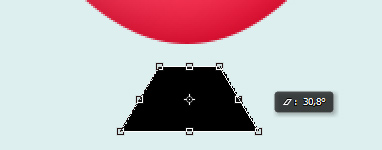
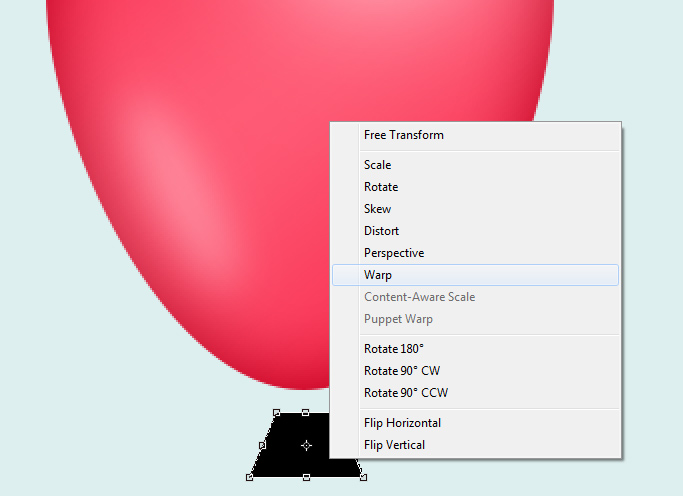
To create the small knot under the balloon create a new layers first. Pick the Rectangular Marquee Tool (M) and draw a small shape like the (image a). Fill the selection with black color and press (Ctrl + D) to deselect. Go to Edit > Transform > Perspective and change the shape similar to (image b). Next, with the Transform tool still active press right-click on your canvas. Select Warp and change the shape similar to (image d).
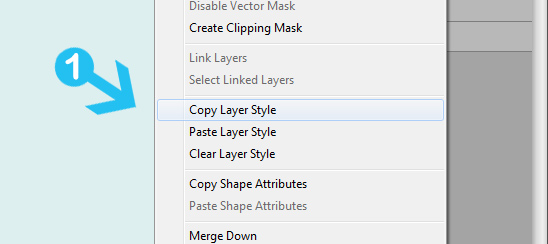
To make the knot color and style the same as the balloon right-click over the balloon layer and press Copy Layer Style (image e). Next, right-click on the knot layer and press Paste Layer Style. Move the knot shape to feet the balloon.

a) Draw a small rectangular shape and fill it with black color.
create party balloons in photoshop step 6a


b) Transform the perspective.

create party balloons in photoshop step 6b


c) Switch to Warp transformation.
create party balloons in photoshop step 6c


d) Create a similar shape.
create party balloons in photoshop step 6d

e) Copy the layer style from balloon and paste it to the knot layer.
create party balloons in photoshop step 6e

Step 5 > Light

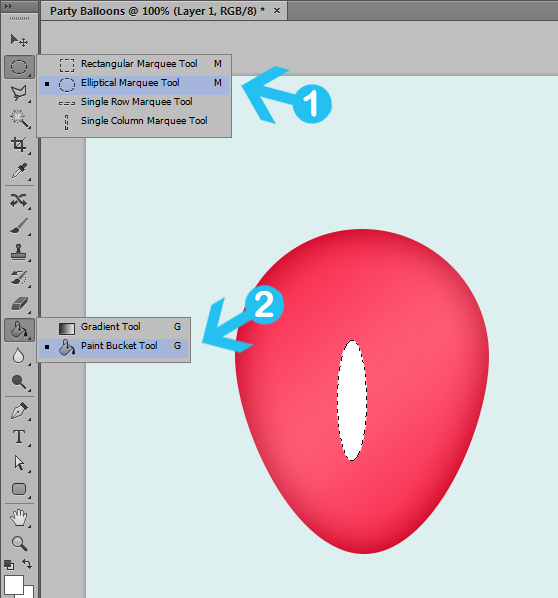
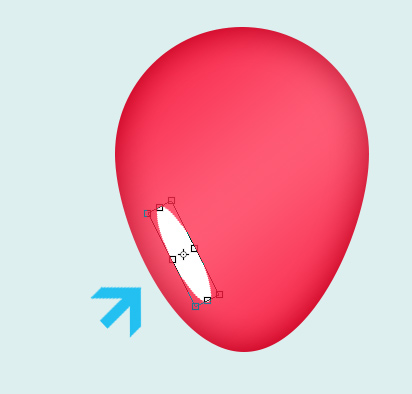
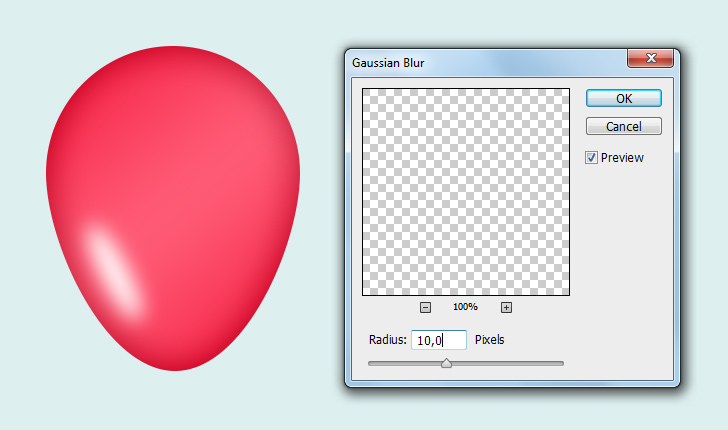
To add light reflections create a new layers first. Pick the Elliptical Marquee Tool (M) in your toolbox and draw a small thin oval shape. Fill it with white color (#ffffff) and press (Ctrl + D) to deselect the selection. Rotate the image and move it to the left lower corner (image b). Next, go to Filter > Blur > Gaussian Blur and add 10 pixels radius. Change the layer opacity 30%.

a) Draw a small oval shape and fill it with white color.
create party balloons in photoshop step 4a

b) Rotate the shape and move it down in the left corner.
create party balloons in photoshop step 4b

c) Add Gaussian blur with 10 pixels radius and press OK.
create party balloons in photoshop step 4c

Step 6 > Upper Light

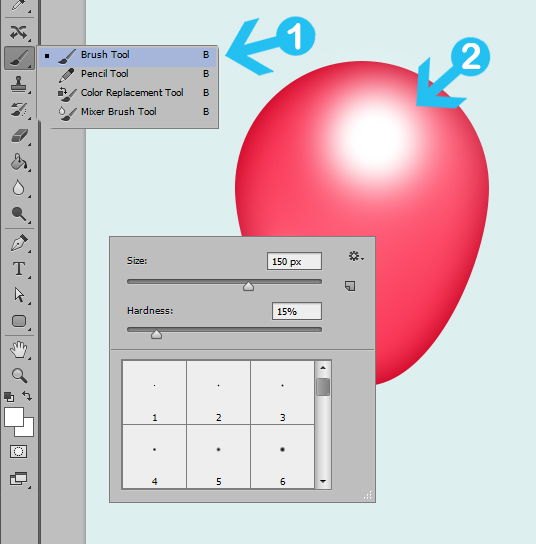
Crate a new layer and pick the Brush Tool (B). Change the brush size to 150px and hardness to 15%.  Paint over the balloon with white color brush like the (image a). Lower the layer opacity to 70%.
create party balloons in photoshop step 6r

Step 7 > Highlight

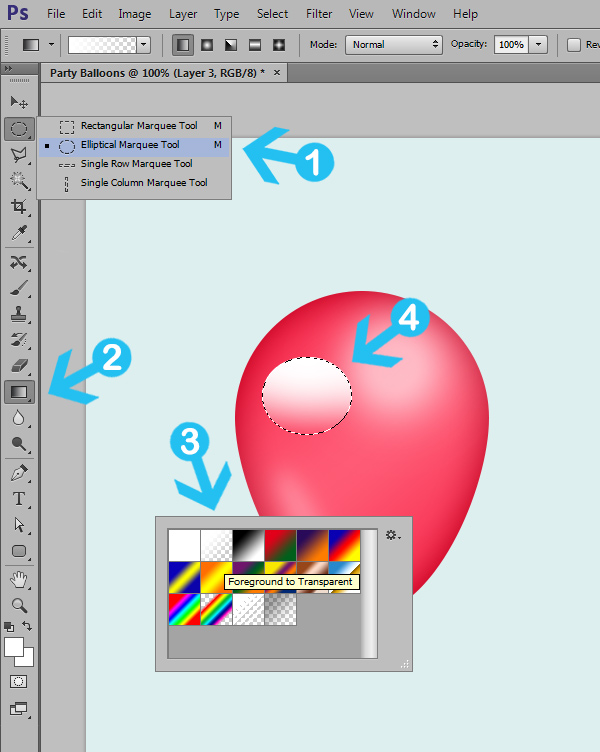
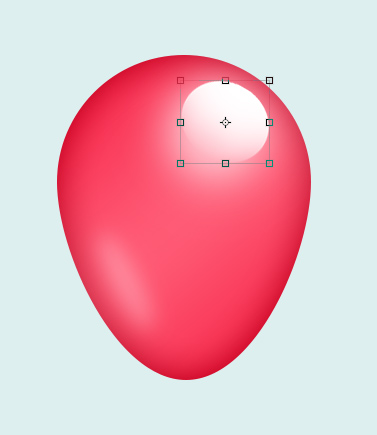
To add the highlight create a new layer and pick the Elliptical Marquee Tool (M). Draw a small oval shape and fill it with white to transparent gradient. To add the gradient use the Gradient Tool (G). Move the shape to the right upper corner. Change the blending mode to Soft Light and lower the opacity to 50%.

a) Draw a small shape and fill it with white to transparent gradient using Gradient Tool.
create party balloons in photoshop step 5

b) Rotate the shape and change the blending mode to Soft Light with 50% opacity.
create party balloons in photoshop step 5c

Step 8 > Rope

Create a new layer and change the foreground color to (#121212). Pick the Brush Tool (B) and change the size of your brush to 3px and hardness to 100%. Next, pick the Pen Tool (P) and draw a Path similar to (image a). Right-click on your canvass and press Stroke Path. In the new tab use Brush as tool and press OK.


a) With the Pen Tool draw a path.
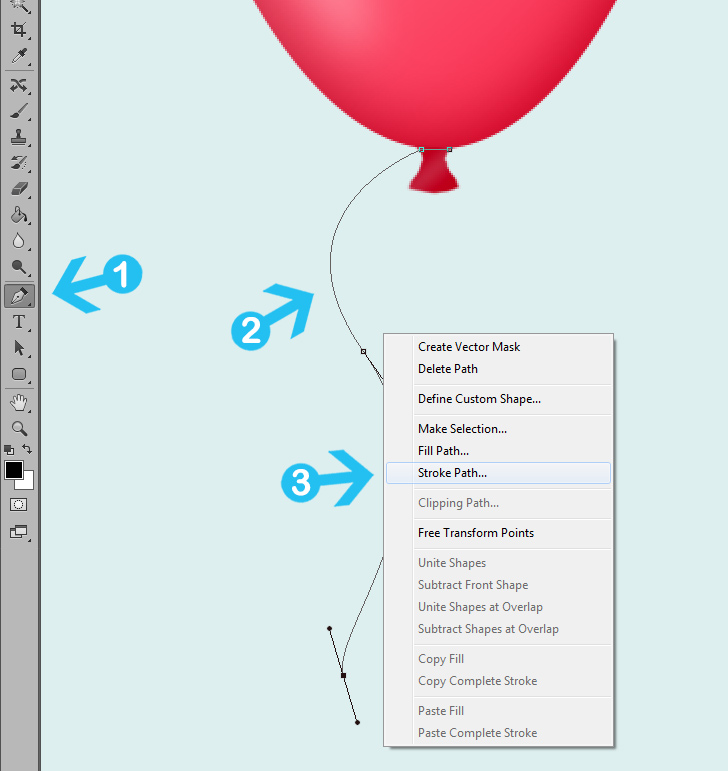
create party balloons in photoshop step 8a

b) Use Brush option for your stroke path and press OK.
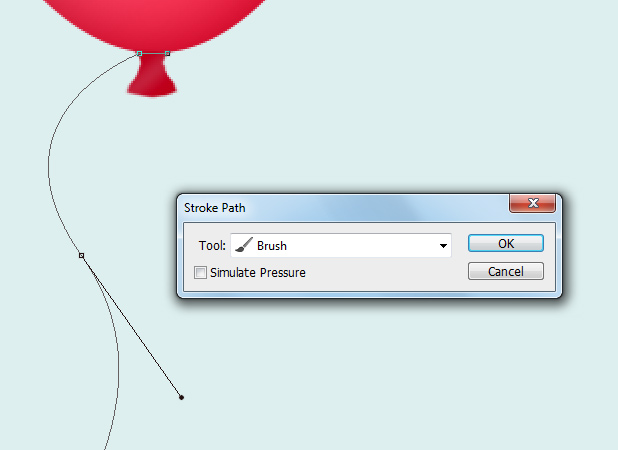
create party balloons in photoshop step 8b

Step 9 > Group Layers

Select all the layers except the background and press (Ctrl + G) on your keyboard. Rename your group to “Red Balloon”. At this point you can move or transform the balloon around the canvas with your group layer active.
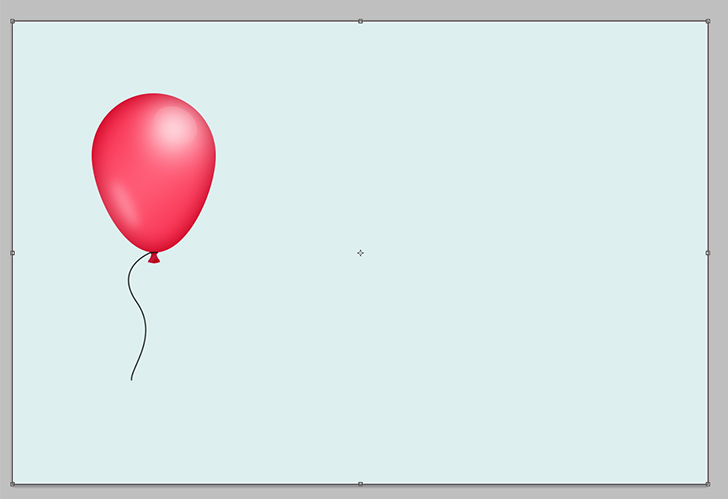
create party balloons in photoshop step 9

Step 10 > Add More Balloons

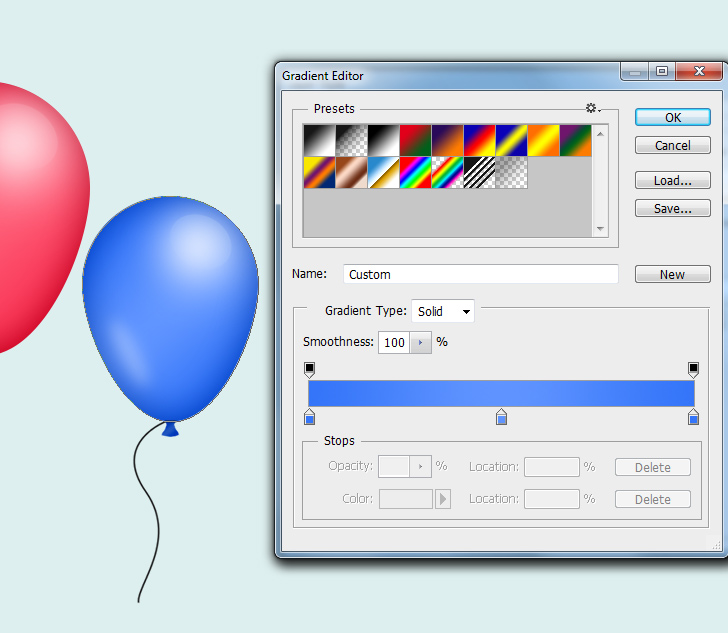
With the red balloon group active go to Layer > Duplicate Group. Change the position and color of the new balloon. To change the color modify the blending options.
create party balloons in photoshop step 10


Conclusion

You can create more balloons by duplicating the existing balloons. To change the color you have to modify the blending options for each balloon you create. Experiment with different shapes and highlights.

create party balloons in photoshop - PREVIEW
Final Image