News

Latest news and current events from around the world including special reports, entertainment news and exclusive video

Business

All the latest breaking business news from banking, stocks, currencies, funds and commodities to rice, garments and tourism

Download

Free downloads for Windows, Mac, iOS and Android computers and mobile devices. Every category of desktop software...

Life Style

Lifestyle is about the parts of our lives that are maybe a little more personal than everything else. It's how we make our homes, relate to our loved ones, raise our ...

Culture

The latest cultural news, criticism, including television, theatre, movies, music reviews, and Goings On About Town.

Health

Get energizing workout moves, healthy recipes, and advice on losing weight and feeling great...

Thursday, February 27, 2014

Create Light Rays in Photoshop

create-light-rays-in-photoshop---featured

Learn How to Create Light Rays in Photoshop

In this Photoshop tutorial we’ll learn to create realistic light rays. This simple technique is great for bright images with light sources. No special Photoshop skills required to create your own cool rays and this tutorial will let you create rays in five minutes.

Tutorial Details and Resources

Difficulty: Beginner
Apps: Adobe Photoshop (CS or later)
Estimated Completion Time: 5-10′ Minutes
Resources: Green Lake

Step 1 > Rays

Let’s go straight to the point and create a new layer. Pick the Polygonal Lasso Tool (L) on your toolbox and create a quick selection in the area where you want to add rays of light. Next, fill the selection with black color and press (Ctrl + D) to deselect.

create light rays in photoshop - step 1

Step 2 > Difference Clouds & Threshold

With the black shape layer active go to Filter > Render > Difference Clouds (image a). Next, go to Image > Adjustments > Threshold and press OK with the default values (image b).

a)
create-rays-of-light-in-photoshop-step2

b)
create-rays-of-light-in-photoshop-step2b

Step 3 > Radia Blur

Go to Filter > Blur > Radial Blur and add change the settings like the image below:

Amount: 80, Blur Method: Zoom, Quality: Good. Make the Blur Center follow the light rays angle and press OK.
create-rays-of-light-in-photoshop-step 3

Result:
create-rays-of-light-in-photoshop-step 3b

Step 4 > Blending Mode & Opacity

Change the Blending Mode to Soft Light and lower the opacity between 50% to 70% depends on your taste.

create-rays-of-light-in-photoshop-step 4

Conclusion

Remember to change the angle of radial blur similar to your image. If your source of light is not the sun but a continuous artificial light then skip step 2.

light-rays-in-ps---preview
Final Image

Replace the Sky in Photoshop

replace-the-sky-in-photoshop---featured

Learn How to Replace the Sky in Photoshop

In this Photoshop tutorial we’ll learn how to replace the sky in Photoshop. When we capture photos, usually something is not looking good inside the picture. Very often the sky is underexposed or overexposed. Sometimes it may be dull or boring. With this easy technique you can replace any sky in minutes.

Tutorial Details and Resources

Difficulty: Beginner
Apps: Adobe Photoshop (CS or later)
Estimated Completion Time: 5-10′ Minutes
Resources: City Hall by William –  Sky by zaphad1

Step 1 > Quick Selection

Pick the Magic Wand Tool (M) with 20 Tolerance and make a selection of the sky you want to replace. You can use your favorite selection method but Magic Wand Tool is quick and easy for images like this.

replave-sky-in-photoshop-step-1

Step 2 > Copy the Sky

Open the new sky image in new Photoshop document and quickly select the sky. Go to Edit > Copy or press (Ctrl + C) on your keyboard to copy the sky.

replace the sky in photoshop - step 2

Step 3 > Replace the Sky

With the City Hall image active go to Edit > Paste Special > Paste Info to replace the sky. Scale the new sky if needed.

replave-sky-in-photoshop-step-2b

Step 3 > Brightness

If the new sky is darker from the original go to Image > Adjustments > Brightness/Contrast and increase the brightness until you like the result. Repeat the same technique if the sky have different color toning but this time change color balance or hue/saturation. For this image i increased only the brightness by 50.


replave-sky-in-photoshop-step-3


Conclusion

When you want to replace the sky try to find a similar image. Images shot in different weather conditions have different white balance. You have to change the brightness and color toning.

final-preview--replace-sky-in-ps
Final Image

Free Countdown Timer

Everyone's had the experience of sitting down at the computer and suddenly realizing that hours have passed in the blink of an eye. Whether you need to remind yourself of an upcoming event or just give yourself a reminder of how much time you've spent online, Free Countdown Timer is a good choice. This basic program provides a simple alarm clock with just enough features to be fun.


The program's interface is clean and very easy to navigate. Adding an event is as simple as clicking the Add button and filling in the relevant details. Free Countdown Timer can sound an alarm after a specified amount of time has passed--from hours to seconds--or at a particular date and time. The program comes with a variety of alarm sounds, but you can easily select your own sounds or songs to use instead. There are a few extras that really make this program shine, including snooze and loop options, and the program's capability of waking the computer from sleep mode or turning on the monitor power. An online Help file doesn't offer much in the way of guidance, but that's okay; everything about Free Countdown Timer is easy to figure out. Overall, there's nothing about this program that really knocked our socks off, but we think it's a great choice if you're looking for a functional, attractive desktop alarm clock.
Free Countdown Timer installs and uninstalls without issues.


Free WiFi Hotspot

Free WiFi Hotspot is a super easy solution to turn your laptop or notebook into a portable Wi-Fi hotspot, wirelessly sharing your internet connections like DSL, Cable, Bluetooth, Mobile Broadband Card, Dial-Up. through the built-in wireless card. By a click of a button, you can get a Wi-Fi Router without the need of buying new hardware from store. It allows you to set the hotspot ID (SSID) & password and select the connection you want. You can also have a clear view of the connection information, operations performed, the settings changed and the running status in a report window.
Free WiFi Hotspot is designed for all modern Wi-Fi client devices like Laptop, Smart Phone, iPod Touch, iPhone, Android Phone, Zune, Netbook, wireless printer. Meanwhile, there is no limit to the number of devices available for hook up to your hotspot.
One important feature of Free WiFi Hotspot is the ability to customize your SSID which stands for Service Set Identification. Now, you can name your hotspot whatever you want and add a password using WPA2 for protection to keep freeloaders out. It is definitely the best way to cut down on data usage of your mobile is to take advantage of free Wi-Fi networks wherever you are. Free WiFi Hotspot, which converts your laptop into a wireless router, will help you stay connected without worrying about there is no unlimited data plan with your cell phone service provider. Free Wi-Fi hotspot means you don't pay. Know where the free Wi-Fi spots are and head for one when it's time for a data intensive session. Cut data allowance - no more overpaying.
What's new in this version: Version 3.0.1 may include unspecified updates, enhancements or bug fixes.
Click to see larger images

Download

Notezilla Portable


After spending some time with NoteZilla Portable, we quickly came to the conclusion that there is a lot more than meets the eye to this very functional calendar and task tool.
Using sticky notes, the program lets you input important tasks. Simply type the text on the note and that's it. You can position the sticky notes wherever you like on your desktop and even place them on top of specific Web sites. If you don't like desktop clutter, you can save the notes in the Memoboard. From the Memoboard, you can organize the sticky notes into categories, and even search for them from the interface. But regardless of where you save the notes, you can change their skin color and priority. The program also lets you schedule appointment reminders so that an alarm ensures that you will never miss an important meeting or event. The alarm feature will not only send you a reminder, but you can opt to launch a specific program. It never failed to work when we put it to the test.
NoteZilla Portable includes an extensive Help menu, but we recommend that you view the tutorial so as to not miss what the entire program has to offer. And with the 30-day trial, you have plenty of time to fall in love with this unique calendar program, just as we did.


Click to see larger images

Tuesday, February 25, 2014

Freeware Keylogger

Freeware Keylogger is a completely free award winning monitoring application. It runs in the background and allows you to monitor all keyboard activities performed on your PC, visited websites, e-mail, chat, openned application and files. Freeware Keylogger helps you to find out, what exactly took place in the system. You will find out what your employee or children search in the internet, and to check them. You will be able to view the reports as HTML files.
What's new in this version: Freeware Keylogger 1.24 has been released with support for Windows 8.1 (32-bit and 64-bit editions) and many other improvements and fixes

null

KRyLack RAR Password Recovery

KRyLack RAR Password Recovery is a program to recover lost or forgotten passwords on RAR (WinRAR) archives. The program has a convenient user interface with Drag-and-Drop is support, work with archives containing only one encrypted file. RAR Archives (All versions including 3.x and 4.x), Multi-volume RAR archives, and Self-extracting archives are all supported. The program is very customizable and you can set the password length, the character set to be used to generate the passwords, mask character, and a couple of other options. You can select the custom character set for brute-force attack (non-English characters are supported), and Brute-Force attack. Dictionary-based attack is available to autosave password search state and resume after a stop or a crash, and maximum password length is not limited. Contain extract tool for ZIP, RAR, and ACE archives and CPU Priority control with Full Skinning Support.
What's new in this version: Version 3.51.62 includes an improved password recovery engine and Windows 8.1 support (x86 and x64 editions).

null

Solid State Doctor

he SSD Utility Suite is an essential tool to provide maximum performance, SMART monitoring and data security for Solid State drives. Manually execute or set the TRIM service to maintain the write performance of the SSD
What's new in this version: New features include over-provisioning and cloning.

null

Magix Movie Edit Pro Plus

Show off your videos in the best possible light Enjoy the full freedom of design when editing videos. Unique features allow you to make your creative ideas come to life. Do you have an action camera from GoPro or another 4K-capable device? With MAGIX Movie Edit Pro 2014 Plus you can edit and export 4K recordings just as easily as HD material. With the new proxy editing you can automatically create easy-to-edit versions of your video files and carry out all the editing steps in realtime. You can also experience editing your videos on the go. With MAGIX Movie Edit Touch for Windows 8 Tablets included, you can edit your videos wherever you are. View program interface. Precise video editing on up to 99 tracks Full 4K and HD support for AVCHD/HDV camcorders and action cameras Full 3D support for importing, editing, and exporting Proxy editing: Ultra-smooth editing of 4K and HD recordings Advanced audio dubbing: 5.1 Surround Sound Mixer. Multicam editing for footage recorded on 2 cameras HDR effects: Optimum image quality with unique contrast values Secondary color correction: Modify individual hues to the smallest detail Intel WiDi support: Watch the preview monitor on TV or projector. Mobile video editing: MAGIX Movie Edit Touch for Windows 8 tablets Including high-quality special effects, cinematic transitions and templates Advanced video editing.
Twice as big, four times as sharp. The new 4K Ultra HD format can display images in more detail than Full HD. Experience your videos in unparalleled quality. Only MAGIX Movie Edit Pro offers the perfect workflow for editing your own Ultra HD videos. Whether it's footage of sporting events from a GoPro or holiday videos from your camcorder, take full advantage of the potential of your video camera and get the best image quality possible. Get started on the go. Perfect at home. With MAGIX Movie Edit Touch for Windows tablets you can now edit your videos right where you made them - on vacation, at family celebrations or at a live show. Quickly and easily remove unwanted scenes, change the scene order and add some text and titles. When you get home you can import and edit projects in MAGIX Movie Edit Pro 2014 Plus.
What's new in this version: - Incredible footage. Smooth editing. - Better performance on all tracks. - 4K - The revolution for your videos. - New touch design. - All transitions in one location. - Now the graphics processor comes into use. - Mobile video editing at your fingertips. - Realistic special effects and templates. - The new toolbar.

null

Magix Movie Edit Pro 2014 Premium

Experience your movies in a totally new way. Every year at MAGIX we select the best effect packages in the world for our Premium version and make them available to you. MAGIX Movie Edit Pro 2014 Premium provides you with a range of unique, high-quality plugins for professional video effects. NewBlue ColorFast combines professional color correction with detailed color grading in a single workflow. You can precisely control color adjustments and apply them to individual image areas or the entire video picture. Use proDAD Heroglyph V4 Pro and create impressive title animations with templates for a wide variety of themes. View program interface.
Features: Precise video editing on up to 99 tracks; Full 4K and HD support; for AVCHD/HDV camcorders and action cameras; Full 3D support for importing, editing, and exporting; Proxy editing: Ultra-smooth editing of 4K and HD recordings; Advanced audio dubbing: 5.1 Surround Sound Mixer; Multicam editing for footage recorded on 2 cameras; HDR effects: Optimum image quality with unique contrast values; Secondary color correction: Modify individual hues; to the smallest detail; Intel WiDi support: Watch the preview monitor; on TV or projector; Mobile video editing: MAGIX Movie Edit Touch; for Windows 8 tablets; Including high-quality special effects; cinematic transitions and templates.
What's new in this version: - Professional color correction. - Amazing animated titles. - Incredible footage. Smooth editing. - Better performance on all tracks. - 4K - The revolution for your videos. - New touch design. - All transitions in one location. - Now the graphics processor comes into use. - Mobile video editing at your fingertips. - Realistic special effects and templates. - The new toolbar.

null

Thursday, February 20, 2014

Add Rain Effect in Photoshop

rain effect in photoshop - photoshop tutorial

Create a simple rain effect in Photoshop

In this quick tutorial, we’ll learn how to create a simple rain effect in Photoshop. For good results make sure your image is good for this effect. Use dark photos with clouds and water. To make the effect more realistic we are going to add a layer mask and change the intensity of rain in some areas.

Tutorial Details and Resources

Difficulty: Beginner
Apps Used: Adobe Photoshop (CS5 or later)
Estimated Completion Time: 5-10′ Minutes
Resources: Girl with umbrella by Angelo

Step 1 > Open the Image

Othen the image you want to edit in Photoshop. I used my example at 1600x 1067px resolution.


add realistic rain effect in photoshop step 1

Step 2 > Highlight

We are going to create a highlight before we add the rain drops. Create a new layer and pick the Brush Tool (B) in your toolbox. Set brush size to 250px, hardness to 0 and #dfdfdf as color. Paint around the girl like the (image a). Next, go to Filter > Blur > Gaussian Blur and add 86 pixels Radius. Press OK to confirm and return back. Set the blending mode to Overlay.

a) Pick a soft grey brush and paint around the girl.
rain drop effect in photoshop step 2


a) Add Gaussian Blur with 86 pixel Radius and set blending mode to Overlay.
rain drop effect in photoshop step 2b

Step 3 > Rain Drops

To create the rain drops firs create a new layer and rename it “Rain Drops”. Fill the new layer with black color (#000000) using the Paint Bucket Tool (G). Go to Filter > Noise > Add Noise and change the Amount to 70%, Distribution to Gaussian and check the Monochromatic box. Next, go to Image > Adjustment > Levels to add some contrast. Set Midpoints to 0,32 and Shadows to 22 like the image b.

a) Add noise with 70% Amount.
rain drop effect in photoshop step 3a

b) Add contrast with Levels.
add rain drop effect in photoshop step 3b

Step 4 > Motion Blur

Go to Filter > Blur > Motion Blur and change the Distance to 14 pixels. Set the Angle to -62 and press OK. Change the blending mode to Screen and lower the opacity to 95%.

add rain effect in photoshop step 4a

Step 5 > Intensity

After the motion blur the rain intensity look the same around the image. To make the effect more realistic we need to lower the intensity in bright areas. First, go to Layer > Layer Mask > Reveal All to add a layer mast. Pick the Brush Tool (B) with 200-250px size, 30% opacity and black color. With the layer mask active paint over the bright areas to make them less intense.

a) Add layer mask and paint over the bright areas with black brush.
rain effect in photoshop step 5a

b) The intensity is not the same anymore.
rain effect in photoshop step 5b

Step 6 > Contrast

To add some contrast and make the image more appealing add a new Curves Adjustment layer (image a). With the RGB channel active change the line similar to (image b).

add rain effect in photoshop step 7a

rain effect in photoshop step 6b

Conclusion

Disable the layers to see the difference after every step. Experiment with the angle of motion blur and rain intensity in bright areas. Every image is different so you have to use different settings.

rain effect in photoshop - preview
Final Image

Create Party Balloons in Photoshop


creating party balloons in photoshop 

Create colorful party balloons in Photoshop

In this Photoshop tutorial i will show you how to create colorful party balloons. To create the balloons we need only 2 shapes and some highlights to make it look three-dimensional. You can also create different shapes, add stars and other shapes when we done.

Tutorial Details and Resources

Difficulty: Beginner
Apps Used: Adobe Photoshop (CS5+)
Estimated Completion Time: 20-30′ Minutes
Resources:

Step 1 > Create a New Document

For this tutorial create a new document with 1200px Width and 800px Height. Change your foreground color to #ddefef and fill the empty background using the Paint Bucket Tool (G).

create party balloons in photoshop step 1


Step 2 > Create the Balloon

Press (D) on your keyboard to reset the colors on your palette. Pick the Ellipse Tool (U) in your toolbox and draw a perfect circle by pressing (Shift). With Direct Selection Tool (A) select the bottom path of your circle and push it downwards.

a) Create a perfect circle with Ellipse Tool.
create party balloons in photoshop step 2

b) With Direction Selection Tool push the bottom path downwards.
create party balloons in photoshop step 2b


create party balloons in photoshop step 2c

Step 3 > Blending Options

With the balloon layer active go to Layer > Layer Style > Blending Options and add the follow settings:

a) Gradient Overlay: 100% opacity, 69% scale and -53 angle.
create party balloons in photoshop step 3a

Gradient colors: #f93454 – #fe5a74 - #f93454
create party balloons in photoshop step 3b

b) Inner Shadow: Black color with linear burn blend mode, 27% opacity, 90 angle and 43 size.
create party balloons in photoshop step 3c

Step 4 > Knot

To create the small knot under the balloon create a new layers first. Pick the Rectangular Marquee Tool (M) and draw a small shape like the (image a). Fill the selection with black color and press (Ctrl + D) to deselect. Go to Edit > Transform > Perspective and change the shape similar to (image b). Next, with the Transform tool still active press right-click on your canvas. Select Warp and change the shape similar to (image d).
To make the knot color and style the same as the balloon right-click over the balloon layer and press Copy Layer Style (image e). Next, right-click on the knot layer and press Paste Layer Style. Move the knot shape to feet the balloon.

a) Draw a small rectangular shape and fill it with black color.
create party balloons in photoshop step 6a


b) Transform the perspective.

create party balloons in photoshop step 6b


c) Switch to Warp transformation.
create party balloons in photoshop step 6c


d) Create a similar shape.
create party balloons in photoshop step 6d

e) Copy the layer style from balloon and paste it to the knot layer.
create party balloons in photoshop step 6e

Step 5 > Light

To add light reflections create a new layers first. Pick the Elliptical Marquee Tool (M) in your toolbox and draw a small thin oval shape. Fill it with white color (#ffffff) and press (Ctrl + D) to deselect the selection. Rotate the image and move it to the left lower corner (image b). Next, go to Filter > Blur > Gaussian Blur and add 10 pixels radius. Change the layer opacity 30%.

a) Draw a small oval shape and fill it with white color.
create party balloons in photoshop step 4a

b) Rotate the shape and move it down in the left corner.
create party balloons in photoshop step 4b

c) Add Gaussian blur with 10 pixels radius and press OK.
create party balloons in photoshop step 4c

Step 6 > Upper Light

Crate a new layer and pick the Brush Tool (B). Change the brush size to 150px and hardness to 15%.  Paint over the balloon with white color brush like the (image a). Lower the layer opacity to 70%.

create party balloons in photoshop step 6r

Step 7 > Highlight

To add the highlight create a new layer and pick the Elliptical Marquee Tool (M). Draw a small oval shape and fill it with white to transparent gradient. To add the gradient use the Gradient Tool (G). Move the shape to the right upper corner. Change the blending mode to Soft Light and lower the opacity to 50%.

a) Draw a small shape and fill it with white to transparent gradient using Gradient Tool.
create party balloons in photoshop step 5

b) Rotate the shape and change the blending mode to Soft Light with 50% opacity.
create party balloons in photoshop step 5c

Step 8 > Rope

Create a new layer and change the foreground color to (#121212). Pick the Brush Tool (B) and change the size of your brush to 3px and hardness to 100%. Next, pick the Pen Tool (P) and draw a Path similar to (image a). Right-click on your canvass and press Stroke Path. In the new tab use Brush as tool and press OK.


a) With the Pen Tool draw a path.
create party balloons in photoshop step 8a

b) Use Brush option for your stroke path and press OK.
create party balloons in photoshop step 8b

Step 9 > Group Layers

Select all the layers except the background and press (Ctrl + G) on your keyboard. Rename your group to “Red Balloon”. At this point you can move or transform the balloon around the canvas with your group layer active.

create party balloons in photoshop step 9

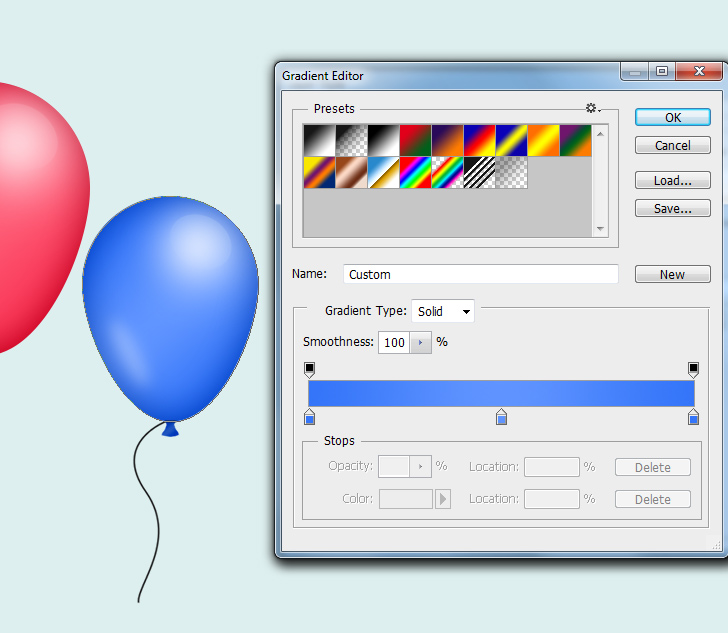
Step 10 > Add More Balloons

With the red balloon group active go to Layer > Duplicate Group. Change the position and color of the new balloon. To change the color modify the blending options.
create party balloons in photoshop step 10


Conclusion

You can create more balloons by duplicating the existing balloons. To change the color you have to modify the blending options for each balloon you create. Experiment with different shapes and highlights.

create party balloons in photoshop - PREVIEW
Final Image